Word Code / Best Practices
How To Create A Simple Template With A User Form
Step Seven
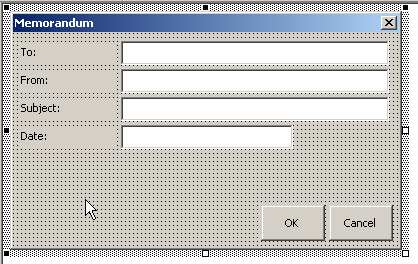
This step is the fun part; this is where the controls are added to the frmMemo class. We will need to add four labels and four text boxes. These will be for the To:, From:, Subject: and Date: entries. We need to rename the four text boxes to 'txtTo', 'TxtFrom', 'txtSubject' and 'txtDate'.
It would be easier to place a label first then the corresponding text as pairs. This is because then the tab ordering will be done automatically, but more on that later.
After the eight controls (above) have been added two command buttons, cmdOK and cmdCancel, needed to be added to the form so it looks like this:

Note at this point in time we have only named the text box controls and the command buttons. We could, if we wish, have named the label controls but, to be honest, people tend to let these go without renaming them providing that they are not referred to programatically at all. If one wanted to label them then the names would be prefixed with 'lbl'; for example, 'lblTo'.
What we have to do next is to fill in the Caption properties of the various objects. The form object itself ought to have the caption "Memorandum". To modify this then click on somewhere blank on the form (we usually aim for the title bar) and then in the properties window change the caption property to Memorandum. Also change the first four labels' captions to 'To:', 'From:', 'Subject:' and 'Date:'. In addition we change the command buttons' captions to 'OK' and 'Cancel'.
The user form ought to look like this:

We are not quite done yet. We have to add the Accelerators. These are the special keys for each of the controls. For example pressing <Alt>T will want to get the user to enter the To: text box.
What happens is that some of the controls have an Accelerator property. This means that if the <Alt> key is pressed then that control is selected. However, labels are slightly different; labels can have an Accelerator but when the user tries to select via the Accelerator the next control in the tab order is selected. This is why we were particular about the order in which we placed the controls on the form. We could have, of course, edited the Tab Order properties at the end but it's easier to get the order right from the start if one has the user form already planned out.
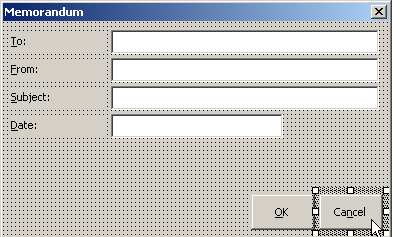
So, the next stage is to add the Accelerators for the various controls. Give the 'To:' label the Accelerator of 'T'. Note that the Accelerated letter in the label is underlined. Give other suitable Accelerators to the other labels and then 'O' to the cmdOK button and 'n' to the cmdCancel button.
The user form now ought to look like this:

One last set of changes to the interface appearance and also to the way that the form operates. Most people will be aware that pressing the <Enter> key is the same as clicking the 'OK' button and that the <Esc> key is akin to clicking the Cancel button. All we have to do is to add this functionality to the form class.
Select the cmdOK button and then in the Properties window search for the Default property. Set that property to be True. With the cmdCancel button set the Cancel property to be True. This simple operation has tied the default keypress functionality to the form.
| << Back | Next >> |
Updates or Comments
If there are any suggestions for updates or comments then please drop us a mail at malcolm.smith@dragondrop.com.
